Quantcast
Channel: ArnoldRenderer – Arnold Support Corner
Viewing all 140 articles
Browse latest View live

[Arnold] Tips for reducing noise when rendering interior scenes with indirect lighting

$
0
0

Indirect lighting of interior scenes can be a challenge, but there are some things you can do. In this post, we’ll give you some quick tips, but you can find more detailed information on support.solidangle.com, both for interior lighting and for troubleshooting noise.

Avoid the Skydome and use a Sky background and Quad lights

Instead of using a Skydome light, use a Sky for the background and quad lights for the light coming in through the windows. The quad lights should just barely cover the entire window.

If there’s anything visible outside the window, you may want to put a spot light on them. Just be careful not to let the spot light go into the room.

Use a distant light to simulate beams of light coming into the room

A distant_light is an easy-to-use option that perfectly matches sun light.

Spot lights don’t produce realistic sun beams since the beams look like they’re expanding, which sun beams don’t do. Moving the spot light further back, and also making sure it’s no larger than it needs to be to illuminate the window, will reduce noise and make it look more realistic.

Don’t put lights too close to the windows

If a light is too close to the window, that means the light hitting the window area is significantly more concentrated and so much brighter than the light hitting the far side of the room and so this produces more noticeable noise.

Make sure your materials are physically based

For example, don’t shade the room Standard shaders with a Diffuse weight of 1, and Diffuse color full white (1 1 1). I don’t think there’s any material known to man that is this reflective. Lowering the Diffuse weight to 0.7 will roughly match white paint and it will also get rid of noise. If it’s too dark, then try increasing the intensity of the lights, increase the number of diffuse bounces, or increase the camera’s exposure.

For a richer look, avoid fake lights inside the room

Consider getting rid of any fake lights you may have inside the room, and instead increase the number of diffuse and glossy bounces in order to get an even more realistic look, not to mention make the lighting easier. Doing that does increase render times, unfortunately, but does give a richer look.

hat tip: Thiago


[Arnold] Rolling shutter in a nutshell

$
0
0

What’s rolling shutter? It’s an effect, or artifact, that looks like like this:
3192314056_fa8b5160d2_o

Rolling shutter means that the image isn’t captured all at once, but one scanline at a time:

Lee posted a video walk through of how to get the rolling shutter effect with Arnold. He used C4DtoA, but it’s basically the same recipe in any of the Arnold plugins:

  • Your geometry has to be spinning fast (like a propeller ;)
  • Select your camera, and enable Rolling Shutter. Leave the duration at 0.
  • In the Render Settings, enable motion blur (you don’t need deformation blur, or camera blur).
  • Adjust the number of motion keys, and the shutter length, to taste. As you increase the shutter length to exaggerate the effect, you’ll need more motion keys.

Update: And here’s some more interesting experiments with the rolling shutter effect

[MtoA] MayaFile node uses a default color for missing textures

$
0
0

Here’s something important to remember when you’re debugging a scene…

By default, the MayaFile node uses a default color if a texture is missing.

MayaFile_Use_Default_Color

This means the render won’t abort because of missing textures, and you won’t see ERRORs like these in the Arnold log for missing texture files:

ERROR   |   [texturesys] OpenImageIO could not open "sourceimages/noicon.tx" as tx: Could not open file "sourceimages/noicon.tx"
ERROR   |   [texturesys] Invalid image file "sourceimages/noicon.tx"

So missing textures can easily go unnoticed.

If you need to disable Use Default Color for testing, an easy way is to export an ASS file and then render it with kick -set MayaFile.useDefaultColor false.

I suppose you could also modify the Maya scene file directly:

import maya.cmds as cmds
import os

def set_useDefaultColor(b):
    filenodes=cmds.ls(type="file")
    for item in filenodes:
        cmds.setAttr( "%s.aiUseDefaultColor" % item, b )

set_useDefaultColor( False )

And finally, you can change the default value of the Use Default Color parameter by adding this to shaders/mtoa_shaders.mtd:

[node MayaFile]
	[attr useDefaultColor]
		default		BOOL	false

Cinema 4D R17 crashes at startup when C4DtoA is installed

$
0
0

C4DtoA requires R17.032

I’ve had a number of cases where people had earlier versions of C4D R17 and couldn’t use C4DtoA. That’s because C4DtoA was built against the C4D R17.032 SDK.

c4d_r17.032

[MtoA] Creating the defaultArnold nodes in scripting

$
0
0

Loading MtoA isn’t enough to create the defaultArnoldRenderOptions node. The defaultArnoldRenderOptions node isn’t created until a user opens the Arnold Render Settings for the first time.

In code, you can do it like this:

from mtoa.core import createOptions
createOptions()

# Set default render options
setAttr( "defaultArnoldRenderOptions.motion_blur_enable", 1 )

When createOptions() creates the defaultArnoldRenderOptions node, it also creates the defaultArnoldDisplayDriver, defaultArnoldDriver, defaultArnoldFilter nodes and hooks them up to the defaultArnoldRenderOptions node.

defaultArnoldRenderOptions

Note that for setting defaults like this, you can also user a userSetup.py file. createOptions() calls hook functions that you can implement in your userSetup.py.

[MtoA] Per-light AOVs for volumes

$
0
0


Arnold 4.2.12.2 added support for per-light AOVs for volumetrics.

Here’s how to set up per-light AOVs in MtoA 1.2.6.0:

  1. In the light Attribute Editor, enter a name for the light group.
  2. Create a custom AOV for the light group. Give the AOV a name that starts with “volume_”. For example, if the light group name is “red”, then the AOV name is “volume_red”.

aov_light_group

WARNING mtoa_shading_groups: unresolved reference

$
0
0

Any time you see “node … is not installed” and “unresolved reference” warnings when you try to kick an ASS file exported from Maya, the problem is missing MtoA shaders.


00:00:00 18MB WARNING | [ass] line 259: node "MayaFile" is not installed
00:00:00 18MB WARNING | [ass] line 288: node "MayaShadingEngine" is not installed

00:00:03 23MB WARNING | [ass] line 238: pSphereShape1.mtoa_shading_groups: unresolved reference to 'aiStandard2SG'
00:00:03 23MB WARNING | [ass] line 137: aiSkyDomeLightShape1.color: unresolved reference to 'file1'
00:00:03 23MB WARNING | [ass] line 188: pPlaneShape1.shader: unresolved reference to 'aiStandard1SG'
00:00:03 23MB WARNING | [ass] line 197: pPlaneShape1.mtoa_shading_groups: unresolved reference to 'aiStandard1SG'
00:00:03 23MB WARNING | [ass] line 229: pSphereShape1.shader: unresolved reference to 'aiStandard2SG'

When you render with kick, you need to specify the location of the MtoA shaders. You can do this several ways:

  • Set the ARNOLD_PLUGIN_PATH environment variable. For example:
    export ARNOLD_PLUGIN_PATH=/home/render/solidangle/mtoa/2016/shaders
    set ARNOLD_PLUGIN_PATH=C:\solidangle\mtoadeploy\2016\shaders
  • Use the kick -l flag to specify the MtoA shader location.
  • In Maya, set the Shader Search Path in the Arnold Render Settings, then export the ASS file.

Why can’t I use kick -set options.shader_searchpath ?

$
0
0

You may wonder: why can’t I use kick -set options.shader_searchpath to tell Arnold where to find shaders?

Well, it’s because kick loads the ASS file first, then applies the kick -set parameter overrides. And also, Arnold when loads an ASS file, Arnold automatically loads shaders from the shader_searchpath as soon as Arnold loads the options node.

Here’s the sequence of events:

  1. kick loads all plugins specified by -l or by ARNOLD_PLUGIN_PATH before it loads the ASS file
  2. kick loads the ASS file. When Arnold loads the options node, Arnold automatically loads all plugins specified by options.shader_searchpath.That’s why the options node is at the top of an ASS file: so Arnold can load any required shaders before loading the shader nodes. It you move the options to bottom of the ASS file, the shader nodes in the ASS file won’t be loaded.
  3. Finally, after all the nodes are loaded, the -set parameter overrides are applied. At this point, it’s too late for any shaders from the -set options.shader_searchpath loacation. The corresponding nodes were already discarded during the loading of the ASS file.


Portable ASS files with relative paths and the Texture Search Path

$
0
0

You can make your ASS files portable across different platforms by using relative paths and the texture search path. For example, if all textures are specified by relative paths like “textures/noicon.tx”, then you just have to set options.texture_searchpath to specify the location of the textures folder.

For example

kick -set options.texture_searchpath //server/project/ -dp -dw example.ass

Or if the texture search path is set to an environment variable

export ARNOLD_TEXTURE_PATH=//server/project
./kick example.ass

To use relative paths for texture file names in nodes like MayaFile, aiImage, aiPhotometricLight, and aiSkydomeLight, you just need to do the following:

  • Put a relative path in the file name box (for example, in Photometry File box of an aiPhotometricLight node, or the Image Name box of an aiImage node)
  • Set the Texture Search Path (Render Settings > System > Search Paths)
  • Clear the Absolute Texture Paths check box

You can put multiple locations, using either : or ; to separate the paths (Arnold supports both separators on all platforms: OSX, Linux, and Windows)

You can use environment variables by putting the environment variable name in square brackets. For example:

"[ARNOLD_TEXTURE_PATH]:C:/Assets/IES/;C:/maya/projects/Support/sourceimages"

Forward slashes work on all platforms.

MtoA appends the current project’s sourceimages folder to the texture search path.

[C4DtoA] Installing C4DtoA in a custom location

$
0
0

The C4DtoA installer puts the C4DtoA plugin in the default location: the plugins folder of the Cinema 4D install.

If you want to put C4DtoA somewhere else, like a shared network location, you can use the C4D_PLUGINS_DIR environment variable to point to your custom plugin location.

For example, on Windows I moved C4DtoA to a different drive and then set my environment like this:

set C4D_PLUGINS_DIR=F:\plugins
set PATH=F:/plugins/C4DtoA/arnold/bin;%PATH%

Note that I had to set PATH so C4D could find ai.dll, and that I had to use forward slashes (on Windows, C4D doesn’t like backslashes in the PATH and drops them).

On Windows, the C4DtoA installer puts a second copy of ai.dll in the C:\Program Files\MAXON\CINEMA 4D R17, so you’ll have to remove that ai.dll, and use PATH to point to the ai.dll in the C4DtoA arnold/bin folder.

WARNING : [ass] node name already in use

$
0
0

Shader nodes must have unique names.

So if you’re using standins, each standin ASS file has to have unique shader node names. Otherwise you’ll get unexpected results when you render, like all standins having the same shading, or some “flickering” in animation if the order of standin loading changes.

In the Arnold log, look for “node name already in use” warnings:

WARNING | [ass] standin_01.ass line 50: node name "aiStandard1SG" already in use
WARNING | [ass] standin_01.ass line 58: node name "aiStandard1" already in use
WARNING | [ass] standin_01.ass line 118: node name "file1" already in use
WARNING | [ass] standin_01.ass line 147: node name "aiNoise1" already in use


If each standin should look different, you need to have unique shader names in each ASS file. If you’re using MtoA, that includes the name of the SG node (for example, aiStandard1SG).

[HtoA] [Tip] Speeding up motion blur on VDB volumes

$
0
0

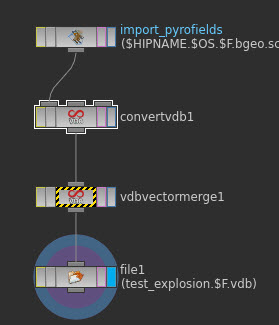
Merging your velocity vel.x, vel.y, and vel.z grids into a single vector grid using a Vdb Vector Merge node can speed up your renders.

vdb_vector_merge

You can safely ignore the “component grids have different transforms” warning on the VDB Vector Merge.  The x, y, and z components of the velocity have slightly different transforms because they located on the center of the cell faces in each direction; that’s coming from the marker-and-cell (MAC) grid used in the simulation.

If you really want to be precise with the velocities, you need to resample them on the same grid, say the density grid:
unnamed
Hat tips to Saber, Fred

The case of the blue render view

$
0
0

Reason #35 why you should check the Arnold log

In this case, a scene that used to render yesterday, now just resulted in a blue render view, like this:

blue_render_view

Anytime the render view doesn’t update when your render, you can be fairly sure there’s some ERROR in the Arnold log.

In this case, the problem was a broken path to the IES file used by a photometric light. In the Arnold log, there was this ERROR:

00:00:04 870MB ERROR | [photometric] can't open C:/Assets/IES/example.ies

It’s easy to say “check the log”, but where do you find the log? It’s not like there’s a nice, color-coded button (red for error) on the render view UI that will pop up the log for you.

  • On Windows, you should see the Arnold log in the Output Windows. However, I find that this happens only when I start Maya from the command line. If I start Maya from the Windows Start menu, the Arnold log messages don’t show up in the Output Window. So I have to enable file logging, and check the log file.
  • On OSX and Linux, you’ll also have to enable file logging, unless you start Maya from a terminal.


[Tip] Save a few threads for yourself

$
0
0

As of Arnold 4.2.12.0, you can specify a negative number of threads, and Arnold will leave that many threads free. So, for example, if you want to leave two threads free for Maya while the IPR view is running, you would set the thread count to -2.

mtoa_threads

On a machine with 4 cores and 8 logical cores (aka threads):

| running on StephenBlair-PC, pid=16888
| 1 x Intel(R) Xeon(R) CPU E3-1240 V2 @ 3.40GHz (4 cores, 8 logical) with 16338MB
| Windows 7 Professional Service Pack 1 (version 6.1, build 7601)

You would then see that Arnold uses only 6 logical cores:

|  starting 6 bucket workers of size 64x64 ...

The advantage of the negative thread count is that you don’t have to know how many logical cores your machine has; you just need to know how many you want to keep free.

[Arnold] Loading obj files with the procedural node

$
0
0

An Arnold procedural node (aka a standin) can load OBJ files.

procedural_obj


[MtoA] Adding per-face and per-vertex user data

$
0
0

With Maya and MtoA, there’s no easy way to add per-face and per-vertex user data attributes to objects. You’ve got to do it with scripting: add an array attribute with addAttr and then provide the values. For example, here’s how to add per-face and per-vertex attributes, which MtoA will translate to UNIFORM (per-face) and VARYING (per-vertex) user data on the shape.

import maya.cmds as cmds
# Add UNIFORM (per-face) user data
cmds.addAttr("pPlaneShape1", dataType="vectorArray", longName="mtoa_uniform_myPerPolyColor")
cmds.setAttr("pPlaneShape1.mtoa_uniform_myPerPolyColor", 4,(0.48, 0.39, 0.35), (0.62, 0.63, 0.44), (0.47, 0.69, 0.33), (0.70, 0.38, 0.29), type="vectorArray")

# Add VARYING (per-face vertex) user data
cmds.addAttr("pPlaneShape2", dataType="vectorArray", longName="mtoa_varying_myPerPointColor")
cmds.setAttr("pPlaneShape2.mtoa_varying_myPerPointColor", 9, (0.46, 0.55, 0.66), (0.29, 0.40, 0.38), (0.69, 0.43, 0.68), (0.36, 0.58, 0.55), (0.59, 0.48, 0.27), (0.55, 0.52, 0.70), (0.48, 0.35, 0.26), (0.46, 0.46, 0.47), (0.34, 0.55, 0.31), type="vectorArray" )

After you run the script to add the attributes, you can use the aiUserData shaders to get the user data values and use them in your shader trees.

aiUserDataColor

For example, here’s the per-face and per-vertex user data colors on a simple grid:

uniform_varying_user_data

[Arnold] ndoteye shade mode

$
0
0

The Utility shader has a super-fast ndoteye shading mode. This shading mode doesn’t trace any rays: it simply shades based on the angle between camera (eye vector) and  the surface normal (ndoteye = dot product of the Normal and Eye vectors).

Here’s an example of the Utility shader. The middle mesh has the ndoteye shade mode (the left mesh has plastic, and right ambocc).

ndoteye

Note that with ndoteye you get just black in the glossy reflection. That’s because in ndoteye shade mode, the Utility shader handles camera rays only. No secondary rays like glossy or refraction.

[MtoA] mtoa missing from Plug-in Manager

$
0
0

If mtoa.mll is not listed in the Plug-in Manager, that means that Maya did not find the MtoA module file (mtoa.mod). And if you try to manually load mtoa.mll, you’ll get errors like this:

// Error: file: C:/Program Files/Autodesk/Maya2016/scripts/others/pluginWin.mel line 781: Unable to dynamically load : C:/solidangle/mtoadeploy/2016/plug-ins/mtoa.mll
The specified module could not be found. // 
// Error: file: C:/Program Files/Autodesk/Maya2016/scripts/others/pluginWin.mel line 781: The specified module could not be found. (mtoa) //

To load MtoA, you need to make sure that Maya finds the MtoA module file.

By default, the MtoA installer puts the mtoa.mod file in the user’s modules folder. For example:

C:\Users\StephenBlair\Documents\maya\2016\modules

If you installed MtoA using one user account, and try to run Maya with a different user account, Maya will not find the module file.

The module file has to be in the MAYA_MODULE_PATH. For example, for the user account “StephenBlair”, here are the default places where Maya looks for modules:

  • C:/Program Files/Autodesk/Maya2016/modules
  • C:/Users/StephenBlair/Documents/maya/2016/modules
  • C:/Users/StephenBlair/Documents/maya/modules
  • C:/Program Files/Common Files/Alias Shared/Modules/maya/2016
  • C:/Program Files/Common Files/Alias Shared/Modules/maya
  • C:/Program Files/Common Files/Autodesk Shared/Modules/maya/2016

If you want MtoA to available to all users, then you could copy mtoa.mod to one of the common locations.

[Arnold] [kick] Enabling tiled EXRs

$
0
0

Suppose you have a load of ASS files that were exported with the Tiled option disabled. How could you re-enable the Tiled option without re-exporting the ASS files?

With the kick -set flag, that’s how:

kick -set display_exr.tiled on

That will set the tiled parameter for all EXR driver nodes in the ASS file.

If you want to set the flag for a specific driver node, you need to know the driver node name.

kick -set defaultArnoldDriver@driver_exr.RGBA.tiled on

That sets tiled for the driver_exr node named defaultArnoldDriver@driver_exr.RGBA.

[MtoA] [Arnold] The case of the mesh light and the facing-ratio material

$
0
0

In this case, we have a torus as a mesh light.

The mesh light color is facing-ratio ramp, so that in the Beauty AOV, the polygons facing the incoming camera ray are red, and polygons facing away are green.

facing-ratio-1

The plane below the light has a [slightly non-realistic] combination of diffuse, specular, and reflection (Kd=0.7, Ks=0.5, Kr=0.2).

The question here is: why do we see red in the reflection AOV, but green only in the diffuse and specular AOVs? Why does the facing-ratio ramp return red for reflection rays, but green for diffuse and glossy rays?

The answer is that there are no diffuse or glossy rays in this situation. A mesh light gets a meshLightMaterial shader, which MtoA assigns to the mesh light color (and to the torus shape) when MtoA translates the scene to Arnold.

The meshLightMaterial shader doesn’t handle diffuse, glossy, or shadow rays. The first few lines of the meshLightMaterial shader look like this:

if (sg->Rt & (AI_RAY_DIFFUSE | AI_RAY_GLOSSY | AI_RAY_SHADOW))
 {
 sg->out.RGBA = AI_RGBA_BLACK; 
 return;
}

Let’s take a look at what’s happening in the different AOVs.

Reflection

The reflection rays hit the bottom of the torus, go through the facing-ratio ramp, and return red because most of the polygons are facing down towards the plane. In this case, we get the facing ratio of the polygon normals and the reflection ray.

facing_ration_reflection

Specular

We get the green from the light sampling, where there’s no rays.

facing-ratio-glossy

Since there’s no rays, we get the dot product of the surface normal and  0 0 0, which is 0. And that returns green from the ramp:

facing-ratio-ramp

Diffuse

The diffuse rays don’t make a contribution (because the meshLightMaterial doesn’t handle them) so we get green from the light sampling (just like for specular).

facing-ratio-diffuse

Indirect Specular

This would be black, since the meshLightMaterial doesn’t handle glossy rays, so the mesh light makes no contribution to the glossy reflections.

Viewing all 140 articles
Browse latest View live